Histograms, Exposure and Dynamic Range

In our previous tutorial about Exposure we discussed the use of the Camera Histogram to check if the picture is properly exposed, in this tutorial we are going to talk a little more in detail about histograms and what they meand and we are going to introduce the concept of Dynamic Range which is really important in digital pictures. The purpose of this tutorial is to understand histograms in detail, to understand what dynamic range is and means and to use those concepts to refine our knowledge about exposure.

Histograms

There are two types of histograms that are used in digital cameras: RGB histograms and luminance histograms, some cameras use one type and some cameras use the other and in some models you can choose which histogram type to use.

RGB Histograms

The RGB model represents pixels indicating the value of red, green and blue contained in the picture. When the maximum level of both red, blue and green is found you have white, when the three colors measure zero you have black. In a RGB histogram the camera plots for each channel the number of pixels corresponding to each level, from zero in the left extreme of the histogram to maximum in the right side of the histogram. Then the three channels are plotted at the same time in the histogram.

This type of histogram is good to understand how colors are represented in the picture but is not very good to judge exposure because if you have pixels that are completely red, blue or green in your picture they will appear as peaks on the right side of the histogram when they are not overexposed areas in the picture just too red, too blue or too green. So RGB histograms should be carefully analyzed when your image contains very bright and vivid colors and specially when the image contains pure representations of these three colors.

Luminance Histograms

In a Luminance histogram the luminance of each pixel is computed as an average of the green, red and blue channels. Since the human eye is more sensitive to the green color the average is computed as 59% of the value for the green color, 30% of the value for the red color and 11% of the value for the blue color. The result is then plotted in the histogram as an indication of how bright the pixel is. In general luminance histograms are better to judge the exposure of a picture than RGB histograms and RGB histograms are better to determine the color clipping and ranges in the picture.

Dynamic Range

The X-Axis of the histogram represents the brightness of the pixel and the Y-Axis represents the number of pixels that have that brightness. The X-Axis then is what we call the "dynamic range" of the camera meaning the number of different brightness levels that can be computed. Anything darker than the darkest level that the camera can capture will appear completely dark in the picture regardless of its true color and will be labeled "underexposed". Any pixel brighter than the maximum brightness in the dynamic range will appear completely white and will be "overexposed" or "burned" in the picture.

Digital cameras as well as SLRs have usually a dynamic range of 5 f-stops being each f-stop half the brightness of the previous one. This is why some histograms are divided in five columns or zones. The total number of "brightness levels" that can be captured is generally 4096 (12 bits per pixels) but this doesn't mean that each f-stop has 4096/5 brightness levels. Because each f-stop is halves the brightness of the previous one the number of "tones" in each f-stop is also halved. The brightest f-stop that the camera can sense will have half the tones: 2048, the next f-stop will have 1024 and so on:

First f-stop: 2048 levels.
2nd f-stop: 1024 levels.
3rd f-stop: 512 levels.
4th f-stop: 256 levels.
5th f-stop: 128 levels.

So there are more "levels" for the brightest tones in the picture than for the darkest tones. This is why very dark pictures with many shadows or dark backgrounds tend to look posterized when printed because the number of tones in the camera sensor for the dark colors is not enough to match the picture range.

Exposure Revisited

The real world is generally represented in 10 f-stops from the minimum level of light that can be used to see barely something to the full reflection of the sun in a white surface. So a scene can have up to 10 f-stops of range or less. When the scene has 5 stops or less you can expose it perfectly with your camera but when the dynamic range of the scene is greater than the range of the camera you will be forced to either underexpose or overexpose some pixels. To solve this problem there are some solutions that can be used.

The first solution can be used when the foreground is too dark and underexposed for a properly exposed background, you can then reduce the dynamic range of the scene illuminating the foreground with your camera flash. Some trials about the proper flash compensation to be used might be needed.

A second solution is to use a natural density filter for the image, the filter will reduce the brightness of some areas thus reducing the range of the scene, for some landscapes this has a good effect and in some other situations it just doesn't.

The final solution is not to change the dynamic range of the scene and use bracketing to take the same scene with different exposure levels and then digitally blend the exposures to get a picture where everything is perfectly exposed. This technique captures the complete range in the scene but requires some work with your photo edition software to combine the exposures. The auto-bracketing feature in some cameras can be used to automatically take 3 pictures with different exposure levels. Make sure that the overexposed shot has all the dark areas perfectly represented and that the underexposed shot has all the bright areas within the camera range.

Exposing to the right for RAW pictures

As we have mentioned the camera has more levels for the bright tones than for the darker ones so if you are shooting in RAW mode where the image is stored as-is seen by the sensor without any processing then you should try to sligthly overexpose your pictures trying to put as many pixels in the right side of the histogram as you can. Of course you have to avoid "blinkies" or pixels that overflow the histogram and are burned but the maximum exposure that can be used without any blikies is your goal.

So try increasing the exposure until you can't increase it more or some pixels will be overexposed and take the picture without worrying about the result. Then adjust the brightness and contrast with your photo editing software, in this way you will be using the maxmimum number of total colors you can for the picture and this is the way to avoid any pixelation or posterization in the final result. This is an important trick for professionally looking pictures.

If your camera doesn't have a RAW mode this is not necesary because the JPG picture is already processed by the camera, compressed and represented in a 8-bit model.
Landscape Photography

Introduction


Landscapes are beautiful but the difference from a point & shoot landscape and a professional picture can be dramatic. In this article we will try to cover some tips and ideas to make your landscape photography better and the best way to start is with the four key things to a succesful landscape photo: Time, Location, Settings and Composition.

Time and Location

The two most important factors in landscape photography are of course time and location. Without a good location nothing can be done and even with a good location you need to be there at the right time. The right time is defined by two narrow windows of time centered at sunrise and sunset. Only a few minutes before and after sunrise and a few minutes before and after sunset are appropiate for landscapes, the reason is that at those times is when the lightning conditions are perfect to show all the colors in the spectrum without becoming too white or too dark, mattices and contrasts are also more intense and every color can be captured as-is. More than 80% of professional landscape pictures are taken at the "golden time" so get early or stay late if you want your picture to look like a pro.

Settings and Composition

Assuming you are at the right place at the right time the next step is to get the right settings for your camera and compose the shot.

For the right settings you basically need to set your focal length, aperture, ISO sensitivity and shutter speed so we'll take a quick look at which values are recommended now.

For a landscape you usually want your lens to be as wide as it can be, wide angle lenses or zoom lenses in wide-angle mode are usually used. Something from 18mm to 28mm is very common for landscapes but depending on your composition you can zoom more, the general rule is to avoid using the zoom if you can and get as close as you can to shoot in wide-angle mode, the wide-angle perspective is usually more pleaseant for a landscape.

You also want everything to be sharp and in-focus so you will need a very large depth of field, to get this you need a very small aperture (large f-number) that is why landscape pictures are usually taken with f16 or higher. F16, f22 and f36 are normal apertures for landscape pictures.

Once the camera is at the right place and the aperture is set you need to determine the shutter speed metering the light in the scene, for a landscape the sky is usually the de-facto place to take the metering. Aim your camera to the sky away from the sun if backlit and take a reading of the suggested shutter speed. Using manual mode fix that shutter speed along with your previously selected aperture and then recompose the shot. Don't worry if the camera says the picture is over or under exposed because that only means that the metering algorithm is probably not good for your scene.

Since a very small aperture is going to be used at sunrise or sunset the amount of light in the scene will be really dim and a long shutter speed is probably needed. This is why a tripo is an absolute must-have for landscapes, fix the camera to the tripod and use a remote shutter to take the picture or the camera self-timer to avoid movement when the shutter is pressed. If your camera has a mirror lock-up mode use it to further minimize movement of the camera when the picture is taken. Only a super-steady camera can achieve a sharp picture with a long exposition time if the conditions are windy try to protect the camera from the wind with a screen, piece of cardboard, a car or even your body.

Now that we are familiar with the settings and the procedure lets take a look at some composition tips and ideas.

Telling a story

There are no people and no expressions in landscape pictures so the scene is the story. The best way to tell a story with a landscape picture is to make sure you have a foreground a background and something in the middle.


This creates a story-telling effect in the eyes that go from the foreground to the background for a very satisfactory result. A very narrow aperture is critical to have both the foreground and background in focus to look sharp in the final result. The foreground can be a rock or group of rocks, plants or flowers, grass or something else. The background is usually the sky, the mountains or a forest.

The Horizon and the rule of thirds

Most point & shoot photographers place the horizon right in the middle of the shot. This is not a good idea because if both the sky and the ground have the same space it is hard for the brain to judge what is important in the composition and the center of attention flips from one to the other resulting in a bad overall experience when looking at the picture. The general rule is to place the horizon 1/3 above the bottom of the picture when the sky is the important feature or 2/3 from the bottom of the picture when the ground is the important thing.


The rule of thirds based in the golden ration automatically creates a pleaseant composition for the eye. If there is an important object in your composition like a tree place it 1/3 from the right of the picture too, do not center it. Remember thirds are good and halfs are bad when composing.

The second important rule for the horizon is to keep it straight. You will surprised to know in how many pictures the horizon falls to the right or the left of the picture. Sometimes the eyes of the photographer are too focused in some object and while framing that object the horizon is left unattended.


The result can be a picture where the horizon is not straight, when we see the pocture this automatically produces a bad effect in our brains because if the eyes notice the horizon is not straigth they will automatically assume the picture is "wrong" in some way. Always check the horizon line when composing your picture and if needed use a bubble lever to make sure your camera and tripod are straigth.

Of course rules exist to be broken but make sure you have a reason when go against them.

Diagonals and zigzags

Diagonal lines and zigzags are usually nice in landscape photography. When you use something with a diagonal shape try to make it enter or exit the picture from one of the corners, this creates a "path" that the eye will follow to examine the picture.


Zigzaglines have a very similar effect they create a "path" to examine the picture and the curves are usually nice to trace for our eyes resulting in a beautiful picture.


Representation of the path traced by the eyes following an S-shaped curve. S-shapes are usually easy to follow by the eyes and they scan the picture quickly for a more appealing result.

Framing

Another good composition rule is to frame the scene is possible. This doesn't mean that you have to surround your composition with objects it just means that if you have something to place at the edges of the picture the framing effect will have a good result.


Sometimes you frame on both lateral edges other times from the top and one of the edges. Left and top along with left and right are usually the two best combinations if you only have 2 framing elements in your compositions.

Focus

The next big question is where to focus when you want everything to be sharp? With a narrow aperture such as f22 or higher this may not seem important because of the very huge depth of field everything will seem to be well focused so you may think that you can focus anywhere. Others always try to focus in the background or the foreground objects. From experience the best place to place the focus is usually somewhere 1/3 up from the bottom of your composition. It doesn't matter a lot where you focus but how high your focus is for a better overall result.


If you have a very special feature in your scene this is clearly overruled and you have to focus in your subject but when there is no subject and just the hole landscape the 1/3 rule works well.

Smooth Skies and reflections

Sometimes in landscape pictures the amount of exposure you need for the ground objects can make the sky appear featureless even if the color is right. Another common problem is to have harsh reflections in the water if you have a lake or stream in your picture. Both problems can be solved, usually with the aid of a polarizing filter. The polarizer will make the sky look better with more definition and features and can soften or eliminate the reflections from the water bodies.


The key to a polarizing filter is to have the sun at a 90 degrees angle from your position, the polarizer is optimal at this angle and starts to underperform if the angle changes, with the sun directly in front of the scene or directly behind the polarizer is almost useless. So if possible make sure you have the sun on the left or the right of your scene, use your index and thumb fingers in a "L" shape, if your thumb points to the sun your index points to the best direction for your picture. Adjust the polarizer filter to your lens and rotate it until you get the sky or the water in the way you want.

Smooth Water

Water streams and lakes with small tidal movement or waves can be smoothed in a landscape picture using a sligthly longer exposure time.


Exposures from 1 to 4 seconds are usually good enough to smooth the water bodies producing a silky effect. If this is what you need then experiment with different shutter speeds adjusting your aperture to the value that you need to.

Impossible landscapes

Sometimes the scene and the light are problematic for your shot. Maybe you want to use a 2 second shutter speed to smooth water but the aperture that you need to use makes the picture unfocused. Maybe the lighting conditions make impossible to get both the sky and the ground properly exposed, when the sky is right the ground is underexposed, when the ground is right the sky looks burned. In a backlit scene maybe you get too many shadows or silouettes you don't want or the opposite thing may happen you may want silouettes but you can't get them to appear without making everything too dark.

When you are just about to give up there is one more thing you can do which is bracketing. Exposure bracketing means taking several pictures of the same scene with different exposures and then digitally combining them to get the result you want. Many cameras have a bracketing mode where you set the differential in exposure and the camera automatically takes 3 shots, one with the selected exposure, one overexposed and one underexposed. If the camera does not have a bracketing mode you can do that manually changing the exposure without moving the camera and taking different shots. Then with your favourite photo editor you can blend the different exposure pictures to get one where everything has the right exposure.

This is the same technique used for HDR pictures, HRD pictures are the result of processing via tone-mapping a series of pictures with different exposures, the result is usually a very vibrant-looking picture that is very attractive to the eye. Adobe photoshop and photomattix are popular software programs to create HDR pictures automatically from a series of pics.

Conclusions

The technique for landscape pictures is interesting and requires a lot of experimentation to get the best results, the good news is that landscapes usually don't move so you can wait until the light is right, compose your picture in the way you want and prepare the settings you need. If the results are not right the scene will probably be still there so it just needs some patience to achieve professional looking results.

Using your Camera Manual Mode

Many people think that the "M" mode in the camera is something exotic reserved for professional photographers or better cameras but whatever your camera and skills are if you have a manual mode available you can benefit in many situations from using it.

What is manual mode

Manual mode is the mode that allows the user to decide all the parameters for the picture, being the most important ones the aperture, the shutter speed and the ISO sensitivity. You can also control other things such as white balance, focus mode, sharpness, color saturation, flash compensation etc. While there are many things that can be set about 99% of your manual mode pictures just depend on setting the aperture and shutter speed values.

Fighting the camera ideas

The first and most clear scenario for manual mode is when the camera suggests aperture and/or shutter speed values that are not suitable for the situation. In aperture priority mode you set the aperture and let the camera choose the shutter speed, in Shutter speed priority you select the shutter speed and allow the camera to decide the aperture in program mode or full auto the camera decides both values. In all those situations you rely on the camera light meter to calculate the amount of light in the picture and define the proper exposure for the picture but the camera meter is not very smart and while it can take the right decision in 80% of your shots it will go badly wrong in the other 20%. Whenever the camera light meter seems to be wrong about exposure you will probably need to use manual mode to set the aperture and shutter speed values yourself.

Manual mode 101

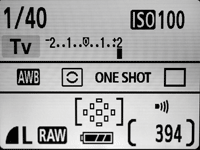
Lets start with the basics and take a few shots in manual mode. Set the camera to manual mode and select a general purpose aperture such as f8. Now that the aperture is fixed pay attention to the exposure indicator in your camera usually a horizontal bar that goes from -2 to +2 with zero in the middle. It is showing +2 in our picture.

That indicator tells you if -according to the camera meter- your picture is under or overexposed. -2 means badly underexposed, +2 is badly overexposed and zero means the exposure is correct. Now if you are in the underexposed zone it means that not enough light reaches the camera sensor so change the shutter speed to a slower value, if you are in 1/500 go to 1/250 and so on until the exposure is right. If you are in the overexposed zone it means you have an excess of light in the picture so switch the shutter speed to faster values, if you are in 1/50 go to 1/100, 1/250 and so on until you are in "zero" exposure. Whenever you are in "zero" exposure your camera light meter is telling you that the exposure is correct for the picture, so fine tune the shutter speed then press the shutter and see the results!

After a few shots following that procedure you can experiment changing aperture and shutter speed values and seeing how they relate in different conditions. If you are in f8 and the correct shutter speed is 1/50 without a tripod the picture will probably be unsharp so you can move to a wider aperture to let more light enter the camera, switch to f5.6 and now your meter will tell you the picture is overexposed, change the shutter speed to 1/100 and the exposure should be right with a faster shutter speed.

Depending on the scenario you can decide to fix the aperture and find the right shutter speed or fix the shutter speed and find the right aperture. When either the aperture or shutter speed that you need is not possible because the scene is too dark you can increase the ISO setting to make the camera more sensible to light and get the same exposure level with a faster shutter speed or narrower aperture.

Adjusting in manual mode

If the picture is underexposed (indicator between -2 and 0)

  • Try slower shutter speeds (you will need a tripod)
  • Increase the aperture (smaller f numbers)
  • Increase the ISO sensitivity (higher ISO number)

If the picture is overexposed (indicator between o and +2)

  • Try a faster shutter speed
  • Switch to a smaller aperture (larger f number)
  • Make sure you are the lowest ISO setting possible (ISO50 or ISO100)

Manual mode 102

So far we learned how to use manual mode to simulate what the camera does in aperture priority mode, shutter speed priority mode or program mode. We fix the aperture or the shutter speed and find the right value for the other setting. As we have mentioned we rely on the camera light meter to do this but the camera light meter is going to be wrong sometimes.

When the exposure looks right and you are in the "zero" zone but your resulting picture is not satisfactory your camera light meter has failed to analyze the light in the scene. You have then several options to correct the picture, one is to change the shutter speed or aperture values to an over or underexposed value and check the result. This is like fine-tuning the exposure until the result is good without considering what the camera says.

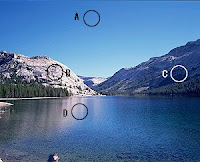
A second alternative is to take the metering in some specific part of your scene like for example the face of a person or the sky (spot A in the picture), skies if you meter way away from the sun are usually a good place to take a metering. To do this you zoom your camera to maximum, point the camera to the area you want to meter (you don't need to be in-focus) and then adjust the aperture and shutter speed to get a zero exposure value while still pointing at the sky. Then you recompose the shot and while your camera will say that the picture is over or underexposed you can take the picture anyway and it will probably look right. This is the key of manual mode because you decide first if you need a fixed aperture or shutter speed, then you decide where to meter the light in the scene, you adjust the exposure and then take the picture.

Conclusions

Using manual mode is not difficult and allows the user to take complete control of the exposure for the picture, small variations in aperture and shutter speed allows some creative exposures to be tried for the same scene and different settings can be tried until you are sure you got the result you want from the scene.

Metering and light

Metering

When you use the camera in full-auto or program mode or even when you use the camera in aperture priority or shutter speed priority modes the camera suggests the right aperture and/or shutter speed to get a correct exposure in the picture. In this tutorial we will try to understand how the camera does this and when we can trust the camera and when we can't as well as other tips and techniques to get the right exposure in our pictures.

The Light Meter

Every modern digital camera uses what is known as a "light meter" to measure the light in the scene and suggest aperture and shutter speed values to reach a correct level of exposure. To determine what is right we will start with a very brief introduction to light and color and then we will explain how the camera meter works.

Any object that is not a light source is colorless, the color of an opaque object depends exclusively of the light reflected by the object, surfaces and materials reflect white light in different ways and that is what makes an object appear of a particular color. A "blue" shoe will look red under red light, will look green under green light and will only look blue under white light, the object is not intrinsically blue it just looks blue when seen under white light.

The camera meter is only able to measure reflected light so to determine the right amount of exposure for a picture it has to rely on the light reflected on the objects that are in range for the camera meter. Since objects reflect light in different ways and the camera is unaware of the physical characteristics of objects some form of calibration is needed. Most camera meters are claibrated to measure light reflected in objects that are 18% gray. So the camera will measure light reflected on the objects in range, assume that they are 18% gray and calculate the light that is inciding on those objects and then based on that calculate the exposure settings for that amount of light. If you understand this you know "everything" about metering.

This means that if all the objects in your picture are 18% gray your exposure will be perfect. Unfortunately objects are not normally gray but in average this calibration works very well for scenes with abundance of colors, landscapes, people groups and many others work fairly well when the camera meter is calibrated for 18% gray. This is why the snow or the Ice look "gray" when you take a picture where white is the predominant color, to get your snow really white you shouldn't aim the camera to the snow, we know aiming the camera to something that you won't shoot is hard to understand but more about that later.

Metering Modes

Abudance of objects that reflect more light than a 18% gray object will make the picture look underexposed while abundance of objects that reflect less light will make the picture look overexposed, this is because the metering algorithm of the camera is not well calibrated for those situations. To avoid this kind of problems many cameras offer different metering modes that we will explain next.


Matrix or Evaluative Metering

This is the default and most used metering mode, it is also the one that works right for most pictures. The camera divides the picture in a grid and then takes each intersection point in the grid and calculates the luminance of that point, it assumes the object on that point is a 18% gray object and then averages all the points in the matrix to calculate the amount of light in the scene. Based on that exposure values are suggested to the user. In this method the complete scene is important and the right corner is as important as the center to calculate the light, this is pefect for landscapes and general photography where the complete scene should be evaluated.

Center weighted metering

In center weighted metering all the scene is considered but points are evaluated as more relevant as they are closer to the center of the picture. The further the point is to the center the less "weight" it will have when calculating the amount of light in the scene for the exposure. This mode is practical when taking portrait picture of backlit subjects and you don't want the subject to appear as silouette. Since the center of the picture is what matters most for the meter if your subject will not be centered in your composition you need to take a meter reading when the subject in the center, lock the exposition or remember the aperture and shutter speed values and then recompose the shot keeping the exposure previously calculated.

Spot or Partial Metering

In this mode only a fraction of the scene is considered for metering and the rest is completely ignored. This is a very specific metering mode that is practical when you know exactly where to take a meter reading for your scene, since this is quite important we are going to discuss it in the next section.

Where to take the reading

We understand how the camera meter works and we understand why it is not measuring the right exposure level in several scenes, you can solve this in two ways: You can start from the camera meter reading and if the picture does not suit your needs adjust the exposure up or down until you get the desired exposure or you can cheat the camera meter and take a special reading for your scene. Backlit scenes for example are particularly hard to evaluate by the camera meter and you get either the foreground or the background over or under exposed.

In landscapes and outdoor photography the sky is usually the best place to take a reading, a frontlit or backlit sky is a very good place to take your reading. The procedure is quite simple: zoom your camera to maximum and take a reading of the sky away from the sun if backlit you want to measure the light reflected in the sky. You don't need to be in-focus we are just measuring light here. Now take a note of the aperture and shutter speed that are "right" according to the camera meter for the sky. Recompose your picture and use those values, the camera will probably start yelling that the exposure is way wrong but you shouldn't care about that. Take the picture and take a look at the result usually the exposure is right even when the camera thinks it is wrong. The problem was that the scene was bad for the camera metering algorithm. Sometimes you have to adjust the exposure anyway after metering in the sky but you usually are closer to the right exposure.

Manual calibration of exposure

If you carry a 18% gray card with you (available at photo stores) you can place your gray card in front of your camera and take a reading of the card (you don't need to be in-focus), since the camera is calibrated for a 18% gray reflectance the camera will calculate the light in the scene perfectly if you take a reading of the card then with the values that are "right" for the gray card take the picture of the scene and the exposure should be right.


To avoid carrying a 18% gray card with you you can take a reading of the gray card once and with the same lighting conditions take a reading of the palm of your hand calculating the difference in exposure from the gray card to your hand. Let's say your hard is 2 stops overexposed compared to the gray card. Next time you are taking a picture you can take a reading on the palm of your hand and adjust the exposure down 2 stops, that should do the trick.

Conclusion

Understanding how the camera light meter works is important to know when you can trust the meter and when you can't you will also know how to correctly calibrate the exposure when the camera meter is not reliable and take pictures with the right exposure.

Shutter Speed

Understanding Shutter Speed

The shutter speed basically regulates how long the camera diafragm will be open letting light reach the camera sensor. When the important thing in your picture is the depth of field you select an aperture and then just change the shutter speed to something that provides the right exposure but sometimes what matters is the shutter speed itself and then you need to regulate the other parameters to match your selected shutter speed for the right exposure.

Whenever speed or motion is important the shutter speed is probably the number one priority, very small shutter speeds can instantly freeze the action capturing a moving object in pefect focus even if it was moving very fast. Larger shutter speeds can create a sense of motion in motionless objects. We are going to explore different situations where the shutter speed is the priority next.

Action freezing shutter speeds

You are probably used to the frustrating experience of taking a picture of a fast moving object, the picture is usually blurred or moved. This means the picture was not taken fast enough and the object moved a little while the light was entering the camera.

The solution to this problem is very simple: Use very fast shutter speeds for very short exposition to capture the action without any noticeable movement. Shutter speeds such as 1/250 or higher should be used, 1/500, 1/1000 are popular for sports, moving cars, jumping people, animals and other action shots. A very fast shutter speed can capture water drops as they fall, freeze a cowboy riding a bull, capture a fast moving bike etc.

The distance from the object to the camera and the speed of the object are the critical factors to choose the right shooter speed, the closer the object is to you the faster the shutter speed will need to be. An object moving fast but distant from your camera can be captured at 1/250 while the same object if closer to you might need a 1/1000 shutter speed.


Very fast shooter speeds mean that light will only be allowed to enter the camera for a tiny fraction of time so you will need a lot of ambient light and a wide aperture to get the right exposure. If you can't change the aperture and light is not enough for the desired exposure and shutter speed you can increase the ISO setting of your picture to make the sensor more sensitive to light.

Panning

Sometimes you want to capture a fast moving object and you want the object to be sharp but the background blurred to imply motion and speed this is achieved with a technique known as panning. When you "pan" you follow the moving object with your camera and use an intermediate shutter speed so the object will be in focus and the background will be slightly blurred due to the camera motion producing an effect that implies speed.


Typical shutter speeds for panning go from 1/30 to 1/8 seconds, the technique is as the object approaches your camera you start to follow it keeping it at exactly the same position then you press the shutter button while you keep following the object, it is a common mistake to stop panning when the shutter is pressed but that is precisely the time when the panning is done.

The shutter will be open for just a fraction of a second but a fraction long enough to make the camera movement blurr the background. If the camera has a auto-tracking focus or a servo-focus option this is the right time to activate it to enhance the focus in the moving object as it is panned.

Water Smoothing

Intermediate shutter speeds from 1/8 of a second to 2 seconds can be used to smooth the movement of water in lakes, streams and falls. In fact the key to the sikly look of water in a picture of a fall is the shutter speed. A tripod is of course needed to avoid movement while the picture is taken and you have to use a remote shutter or the camera self time to avoid movement when the picture is taken.


The intermediate shutter speeds when water is present mean that light will enter the sensor for a long time so you need to adjust the exposure selecting a narrow aperture (large f-number) this means the depth of field will be wide which is normally a very desired effect in landscapes. This is why pictures of landscapes with intermediate exposures not only give the water a smooth and silky appeareance but also render all the scene sharp.

Fireworks

Fireworks are usually one of the things you want to capture but are not easy. The right technique for fireworks is to select the shutter speed first to get the right effect and then adjust the aperture and ISO settings to get the right exposure. It is a common mistake to worry about the level of light first and then your picture will be blurred or just a few colors will be captured.


Fireworks work light waterfalls at night, you usually experiment with exposures such as 1 second, 2 seconds and up to 4 seconds to check the effect, when you are happy with the effect you can then adjust the aperture and ISO setting to have the right level of exposure. The intermediate exposures let the fireworks appear sikly in the picture and at the same time sharp and focused.

Long exposures

Exposures larger than 2 seconds are normally used for night shots and to create light painted scenes. You can take a picture in a complete dark room and while the camera is taking the picture use a flashlight or colorful led lights to create effects.

Large exposures can also be used to capture the lights of moving traffic at night to create a sense of motion, pictures of avenues , bridges and highway traffic are common with exposures from 2 to 8 seconds.


Even larger exposures can be used to take pictures of the stars and the night sky including the mikly way. Exposures from 30 to 180 seconds can be used. For exposures larger than 30 seconds you usually need to have a "bulb" mode in your camera and a remote shutter, when in bulb mode the camera stays open taking the picture and until the shutter is released, the remote shutter can be pressed and locked, then you can wait a minute or two and unlock the shutter.


The larger the exposure is the brigther the stars will be and more stars will appear in the picture, including stars that can't be seen with the naked eye. But longer exposures also mean that the earth rotation can be noticed making the stars streak in the picture. When this is a desired effect use longer exposures for longer streaks. When you don't want this to happen you need to check the larger the exposure can be without streaks (usually under 1 minute) and then increase the ISO sensitivity until you have the right exposure for your picture.

Aperture and Depth of Field

Understanding Aperture

The aperture is the size of the "hole" that captures the light into your camera sensor. The wider the aperture the more light that will reach the sensor in a fixed length of time.

Aperture is measures in f-stops each f-stop indicates a number that divides the focal length of the camera lens. For example if your focal length is 28mm an f2 aperture means 28/2 = 14mm of aperture.

For a 50mm focal length an f8 aperture will mean 50/8 = 6.25mm of aperture. If the focal length is fixed the higer the f number the smaller the aperture will be and less light will reach the sensor. When you use a high f number the aperture will be very small meaning just a tiny fraction of light will pass to the sensor so you will probably need longer shutter speeds to reach the right exposure in your picture.


Aperture and DoF

The aperture setting basically controls the depth of field (DoF) in your picture. The depth of field is the area in your picture where objects will be sharp. A single lens can only focus in one point at the time so as we move away from that point objects start to lose focus and will be less sharp, with smaller apertures the effect is greatly reduced so objects away from the focus point will be sharp and for very very small apertures practically all the points in the picture will be sharp regardless of where the focus is.


In some cameras you have a DoF preview button that will basically switch the camera to the selected aperture and show you in the viewfinder how things will look like. Don't worry if the image in the viewfinder is too dark because you will control that with your shutter speed, what matters is how sharp things are in the viewfinder, control your foreground and background and check if everything looks sharp, if not then you probably need a smaller aperture (bigger f number).

So for large f numbers the aperture will be small, less light will enter the camera and the depth of field will be bigger. On the other side small f numbers will produce a wide aperture with a lot of light entering the camera and a narrow depth of field. These important concepts are helpful to understand when to use each aperture setting.

Landscape Composition Apertures

In a Landscape composition you usually have some foreground like rocks, grass etc. Something in the middle and some background. The foreground and the background are usually sepparated by a long distance and you want both of them to be sharp in your picture. This means you need a very small aperture produced by a very large f-number. Apertures such as f16 and higher are used, f22 to f36 are common for this type of pictures.


Since the aperture is really very narrow the depth of field will be huge meaning everything will be sharp, you usually don't need to care about where to focus the camera and something in the middle should be good enough, if not then you probably need an even higher f-number.

The amount of light reaching the sensor will be reduced enormously by the aperture so a large shutter speed is probably needed and that is why you are going to need a tripod to make everything sharp. A remote shutter is also needed and in case you don't have one you can use the camera self-timer to avoid moving the camera when the shutter is pressed.

General Purpose Apertures

When everything you need to capture is at about the same distance from the camera you don't have to worry about different focal points and you can use an intermediate aperture to make sure your picture will be sharp without the need of a very small aperture. Apertures such as f8 to f11 are normal for these situations. It is common to say "just put your camera on f8 in aperture priority mode and don't worry about the rest" this is a practical advice and really works in general purpose pics but fails when you are in a special situation.

Portrait and object Apertures

When you take a picture of a person or an object you want that person or object to be incredibly sharp and you don't worry about the rest. For these situations very wide apertures (small f numbers) are perfect.

The smaller the f number the more reduced your depth of field will be producing a focused subject with a blurred background. This effect is called Bokeh. For very wide apertures such as f1.8 or f2 the effect is really intense with a focused object and a completely blurred background. If you need a wider depth of field you can go up to f5.6 depending on what needs to be sharp and what not. The wide aperture also means a lot of light will enter the sensor so you will be able to take good portraits and pictures inside a house without needing to use the flash.

Conclusion

Understanding how the aperture and the depth of field relate is critical to be able to select the right aperture for the right situation and the desired final result. Experimenting with your camera in aperture priority mode taking the same scene with different apertures and examining the result is a very important experiment to understand how the aperture works in your camera. You have to experiment to see which aperture produces the best portraits for your camera and lens, which aperture blurrs the background, which is a general purpose aperture and how narrow you have to go for landscapes.

Exposure

What is Exposure?

Exposure is basically controlling the amount of light that reaches the camera sensor when you take a shot.
The picture on the left shows 9 different exposures for the same picture, the extremes are clearly overexposed or underexposed but it is difficult to judge which is the right exposure from the pictures in the middle row. This is where the creativity of the photographer plays a role, there is no right answer and the choice of exposure completely depends on the result you want to achieve.

When your picture is "too dark" you have an underexposed shot meaning not enough light reached the camera sensor. When the picture is "too white" or "burned" your picture is overexposed meaning an excess of light reached the camera sensor.

There are four basic factors that control the exposure. One is of course the ambient light, normally we can't control that unless we are inside a photo studio. The other three factors can be controlled and make what is called the exposure triangle: Aperture, Shutter Speed and ISO.

Aperture

The Aperture controls the amount of light that enters the camera by changing the size of the diafragm. The wider the aperture the more light that will reach the camera sensor in a fixed length of time.

Aperture is measured in "f-stops" and each f-stop measures the number that divides the focal length of the camera to produce the aperture. f-2 for example means focal length divided by 2, so if the focal length is 50 mm f-2 means 25mm of aperture. f-16 with 28mm of aperture would be 28/16 = 1.75 mm of aperture. The higher the f number the narrower the aperture would be.

Aperture is normally used to control the depth of field in the picture. Large f numbers producing smaller apertures increase the depth of field of the camera rendering more objects sharp regardless of the distance from the focus but they also let only small amounts of light enter the camera which means that longer shutter speeds will be needed or the picture will be too dark.

This is why for very large f numbers you start to need a tripod to take a sharp picture. Small f numbers producing wide apertures are good for portraits and interiors pictures without flash because they let a lot of light enter the camera and they will probably produce a very sharp subject with a blurred background.

Shutter Speed

The Shutter speed controls the amount of time that the camera diafragm is opened letting light enter the camera. The longer the time the more light will reach the sensor. If a shutter speed of 1/100 seconds is right for a f2.8 aperture then for f5.6 which is twice as narrow you will probably need a longer shutter speed such as 1/50. The exposure will be identical in both f2.8 - 1/100 and f5.6 - 1/50. So for any given situation there are many combinations of aperture and shutter speed that will render the same exposure but are completely different in terms of the result produced, here is where knowledge of apertures and shutter speeds is important for a creative result.

Long shutter speeds can be used to produce a sense of motion in the picture, panning a moving object is a common technique for a focused object with a blurred background and is used for racing cars, horses, bicycles etc. Very short shutter speeds are good to "freeze" a moving subject and can be used to capture water drops falling, hair movement and for sporting events.

Aperture and Shutter Speed combinations

The picture on the left shows different combinations of aperture and shutter speed that will produce exactly the same level of exposure for a picture.

Choosing the right combination depends on the result you want to achieve if the depth of field is what matters you have to choose the right aperture for the depth of field that you need and choose a matching shutter speed. If the shutter speed is what matters for a particular effect you can fix the shutter speed and choose the aperture that matches.

For general purpose pictures you probably have several choices that produce slightly different results and you can select the one that is better based on creativity. The camera "program" mode in some models can be used to check different combinations of aperture and Shutter speed that will produce the same exposure level. In general when you move from one f-stop to the other changing aperture you need to halve or double the shutter speed for the same exposure level (see diagram).

ISO

The ISO sensitivity is the final element in the exposure triangle, this setting controls how sensitive to light the sensor will be. Normally ISO sensitivity is measured as ISO50, ISO100, ISO200, ISO400, ISO800, ISO1600, ISO3200. Each value doubles the sensitivity to light.

The higher the ISO setting the more sensitive to light the sensor will be. This means that if you increase the ISO setting you will have the same results in terms of exposure with a smaller aperture (larger f number) or a smaller shutter speed. The disadvantage is that the higher the ISO setting will be the more noise the picture will have, in some cameras very high ISO settings produce grainy pictures that can even be used as an artistic effect sometimes.

In modern cameras high ISO settings can be handled without adding a lot of noise which is a great picture but if you want perfect sharpness you should aim to use the lowest ISO setting available.

Sometimes the shutter speed needed for the correct exposure is not feasible, either because the subject will move or because you don't have a tripod to avoid camera movement, in such situations increasing the ISO setting to a higher value will help you render the same exposure with a shorter shutter speed time.

Evaluating Exposure

There are two ways to evaluate exposure after the picture was taken: One is your eye, if you know for sure the picture is good then don't worry about anything else and move to the next one. If you are not so sure you can use the second way which is the camera histogram.

The histogram basically classifies each pixel of the picture in 5 exposure "zones" going from the darkest zone on the left of the histogram to the whitest area in the right of the histogram. Pixels that are too dark will fall to the left border of the histogram and that shows underexposed areas in your pictures. Pixels that are completely white will overflow to the right border of the histogram showing overexposed areas in the picture. In some camera models underexposed or overexposed areas in the picture will blink. The blinkies are what we have to avoid to reach the correct exposure for the picture.

If a picture is underexposed

Underexposed pixels are those that didn't capture any light so they will look completely black regardless of what was in the scene. They will be shown overflowing the left border of the histogram.

Underexposure is not as bad as overexposure, in night scenes or when taking a picture with a black background the picture might look underexposed in the histogram but be correct to your eyes. Always trust your eyes and your judgement more than the camera or the histogram. Furthermore underexposed pictures are sometimes intentional to render some specific details in the scene or produce an effect in the viewer.

To correct an underexposed picture you can:
  • Increase the aperture lowering the f number example go from f5.6 to f4
  • Increase the shutter speed going from 1/500 to 1/250 for example
  • Increase the ISO setting going from ISO100 to ISO200 for example
If you need longer shutter speeds you are probably going to need a tripod to avoid movement and you will benefit from a remote shutter or using the camera timer to avoid vibrations when the shutter is pressed.

If a picture is overexposed

Overexposed pixels are those that got so much light that look completely white and featureless regardless of what was in the original scene. White skies are the most typical overexposure in digital pictures and are called "digital sky" sometimes.

Overexposed pixels will overflow to the right side of the histogram and will blink on the display of some cameras. Unless something really specific was needed such as taking a picture of Ice or Snow those blinkies and overexposed areas should really be avoided. To correct and overexposed picture you can:
  • Decrease the ISO sensitivity (should be the first priority unless you need a special effect) for example go from ISO 400 to ISO 100.
  • Decrease the aperture increasing the f number, go from f8 to f11 for example.
  • Decrease the shutter speed, go from 1/500 to 1/1000 for example.
Conclusion

Aperture, shutter speed and the ISO setting can be used to contol de exposure level on your picture there are several combinations that will produce exactly the same exposure level so we are going to analyze what each aperture and shutter speed means and how to use them in a next tutorial.

Camera Modes

Each Digital Camara provides today several modes to the user, there are modes that are specific for certain situations like landscape mode, portrait mode, night picture etc.

Those modes are usually presets that work fine for those particular situations but it doesn't mean that your landscape picture will be perfect because you put your camera in landscape mode and pressed the shutter. All those modes are completely beyond the user control so we don't have a lot to say about them, you just set the mode and press the shutter without much control of what happens. This is why we are not covering those preset modes in this article.

We are going to talk about the five modes that are usually present in any good digital camera either point and shoot or DSLR: Full Auto, Program, Aperture Priority, Shutter Speed Priority and Manual Mode. Nikon and Canon models will be commented but the information works in the same way for any camera that has the modes that we present.

Full Auto Mode
(Auto in Nikon Models, green Rectangle in Canon)

In Full Auto Mode the camera takes all the decisions for the user, it automatically selects the aperture, shutter speed, flash use and ISO setting depending on the level of light and the picture to be taken. While this mode is usually good for point and shoot situations it is not really very recomendable because there is no camera in the market yet that can take decisions as good as a human being.

Program Mode
(P in both Nikon and Canon models)

Program mode is very similar to Full Auto, the camera automatically selects the Aperture and Shutter speed to match the current conditions, the diference is that it lets the user adjust several settings like ISO speed, exposure compensation, use of the flash and others in case the selected values are not right for the scene. Some cameras also allow the user to creatively alternate different combinations of aperture and shutter speed that will render the same exposure results according to the camera sensor. This mode is the one you want to leave preset in your camera when you store it because you can just turn the camera on and press the shutter button in case of a "moment" picture. The only difference with full auto is the freedom to change some parameters if what the camera suggests is not enough.

Aperture Priority Mode
(A in Nikon Models Av in Canon Models)

In Aperture Priority Mode the user selects the aperture that she or he wants and the camera automatically selects an appropiate shutter speed to match the selected aperture for a right exposure. This mode is useful when you are sure about the camera meter being right about the exposure and when you are sure about which aperture to use. In normal lighting situations with general pictures selecting f8 and letting the camera select the shutter speed can work as an enhanced Program mode because you are controlling the aperture.

Since the aperture controls the depth of field aperture mode is very important when you want to creatively control the depth of field of your picture, you probably want a narrow aperture (f22 for example) in landscape pictures to have a broad depth of field and you probably want a wide aperture such as f2.8 for portraits to blurr the background. Whenever you are sure about the aperture to use and you can trust the camera meter to decide the shutter speed that matches you can use this mode.

Shutter Speed Priority Mode
(S in Nikon Models Tv in Canon Models)

In this mode the user selects the shutter speed and the camera decides the aperture to use to get the correct exposure level in the picture. This mode is not used as often as aperture priority but is still important in some specific situations.

Setting the shutter speed allows the photographer to control the sense of motion in the picture, in sport events or when you need to "freeze" a situation a very fast shutter speed might be needed to capture the subject without blurring. You might also want to select a slightly longer shutter speed for panning when taking pictures of moving objects to get the object in focus with a blurred background for a sense of motion.

Since manual mode is probably the de-facto mode for creative uses of shutter speed the shutter speed priority mode is usually common when you need to take a picture of fast moving subjects and you want to freeze them in your picture, you can then select a shutter speed such as 1/500 and let the camera decide the aperture to use.

Manual Mode
(M in both Canon and Nikon models)

In Manual Mode the user has complete control of both Aperture and Shutter Speed as well as all the other settings in the camera. This is the default mode when you have time to take your picture and you know what you want from your scene. In order to use manual mode you usually select the aperture you want to use according to your depth of field and then take a metering in some relevant place of your picture to adjust the shutter speed to the right exposure you want then the picture is recomposed and the picture is taken. Small variations of the shutter speed can be used to change the exposure level keeping the aperture at the value that you need.

In other words Manual mode is normally used in a very similar to aperture priority mode with the difference of not relying in the camera meter to decide the exposure for the whole picture. The photographer decides depending on the lighting conditions where to meter and then adjusts the shutter speed accordingly, when the picture is recomposed the camera usually yells that the exposure is wrong but that shouldn't be the case in the final picture if the phographer judgement was fine.

Conclusions

  • Do not use Full-Auto mode, leave that for people that don't read this kind of articles.
  • Have your camera ready in Program Mode in case you need a picture taken in milliseconds, even pros do this.
  • Use aperture priority when lighting is even and you want to select the aperture to control your depth of field.
  • Use shutter priority mode when you need to freeze a fast moving subject or when you want to imply motion and you don't have enough time for manual mode.
  • Use manual mode for pictures where you have time to select all the perfect settings for your picture.