What is manual mode
Manual mode is the mode that allows the user to decide all the parameters for the picture, being the most important ones the aperture, the shutter speed and the ISO sensitivity. You can also control other things such as white balance, focus mode, sharpness, color saturation, flash compensation etc. While there are many things that can be set about 99% of your manual mode pictures just depend on setting the aperture and shutter speed values.
Fighting the camera ideas
 The first and most clear scenario for manual mode is when the camera suggests aperture and/or shutter speed values that are not suitable for the situation. In aperture priority mode you set the aperture and let the camera choose the shutter speed, in Shutter speed priority you select the shutter speed and allow the camera to decide the aperture in program mode or full auto the camera decides both values. In all those situations you rely on the camera light meter to calculate the amount of light in the picture and define the proper exposure for the picture but the camera meter is not very smart and while it can take the right decision in 80% of your shots it will go badly wrong in the other 20%. Whenever the camera light meter seems to be wrong about exposure you will probably need to use manual mode to set the aperture and shutter speed values yourself.
Manual mode 101
Lets start with the basics and take a few shots in manual mode. Set the camera to manual mode and select a general purpose aperture such as f8. Now that the aperture is fixed pay attention to
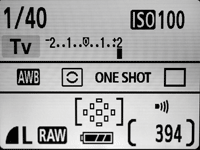
 the exposure indicator in your camera usually a horizontal bar that goes from -2 to +2 with zero in the middle. It is showing +2 in our picture.
That indicator tells you if -according to the camera meter- your picture is under or overexposed. -2 means badly underexposed, +2 is badly overexposed and zero means the exposure is correct. Now if you are in the underexposed zone it means that not enough light reaches the camera sensor so change the shutter speed to a slower value, if you are in 1/500 go to 1/250 and so on until the exposure is right. If you are in the overexposed zone it means you have an excess of light in the picture so switch the shutter speed to faster values, if you are in 1/50 go to 1/100, 1/250 and so on until you are in "zero" exposure. Whenever you are in "zero" exposure your camera light meter is telling you that the exposure is correct for the picture, so fine tune the shutter speed then press the shutter and see the results!
After a few shots following that procedure you can experiment changing aperture and shutter speed values and seeing how they relate in different conditions. If you are in f8 and the correct shutter speed is 1/50 without a tripod the picture will probably be unsharp so you can move to a wider aperture to let more light enter the camera, switch to f5.6 and now your meter will tell you the picture is overexposed, change the shutter speed to 1/100 and the exposure should be right with a faster shutter speed.
Depending on the scenario you can decide to fix the aperture and find the right shutter speed or fix the shutter speed and find the right aperture. When either the aperture or shutter speed that you need is not possible because the scene is too dark you can increase the ISO setting to make the camera more sensible to light and get the same exposure level with a faster shutter speed or narrower aperture.
Adjusting in manual mode
If the picture is underexposed (indicator between -2 and 0)
- Try slower shutter speeds (you will need a tripod)
- Increase the aperture (smaller f numbers)
- Increase the ISO sensitivity (higher ISO number)
If the picture is overexposed (indicator between o and +2)
- Try a faster shutter speed
- Switch to a smaller aperture (larger f number)
- Make sure you are the lowest ISO setting possible (ISO50 or ISO100)
Manual mode 102
So far we learned how to use manual mode to simulate what the camera does in aperture priority mode, shutter speed priority mode or program mode. We fix the aperture or the shutter speed and find the right value for the other setting. As we have mentioned we rely on the camera light meter to do this but the camera light meter is going to be wrong sometimes.
 When the exposure looks right and you are in the "zero" zone but your resulting picture is not satisfactory your camera light meter has failed to analyze the light in the scene. You have then several options to correct the picture, one is to change the shutter speed or aperture values to an over or underexposed value and check the result. This is like fine-tuning the exposure until the result is good without considering what the camera says.
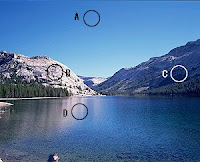
A second alternative is to take the metering in some specific part of your scene like for example the face of a person or the sky (spot A in the picture), skies if you meter way away from the sun are usually a good place to take a metering. To do this you zoom your camera to maximum, point the camera to the area you want to meter (you don't need to be in-focus) and then adjust the aperture and shutter speed to get a zero exposure value while still pointing at the sky. Then you recompose the shot and while your camera will say that the picture is over or underexposed you can take the picture anyway and it will probably look right. This is the key of manual mode because you decide first if you need a fixed aperture or shutter speed, then you decide where to meter the light in the scene, you adjust the exposure and then take the picture.
Conclusions
Using manual mode is not difficult and allows the user to take complete control of the exposure for the picture, small variations in aperture and shutter speed allows some creative exposures to be tried for the same scene and different settings can be tried until you are sure you got the result you want from the scene.
